Run any software stack on Stampede3 by packaging it as a container image. No administrator is involved anywhere in the loop, and the image itself is never registered with Tapis; it stays a job parameter or an input file. For why containers on HPC work this way, and for apptainer versus Docker, see the DesignSafe Workflows book.
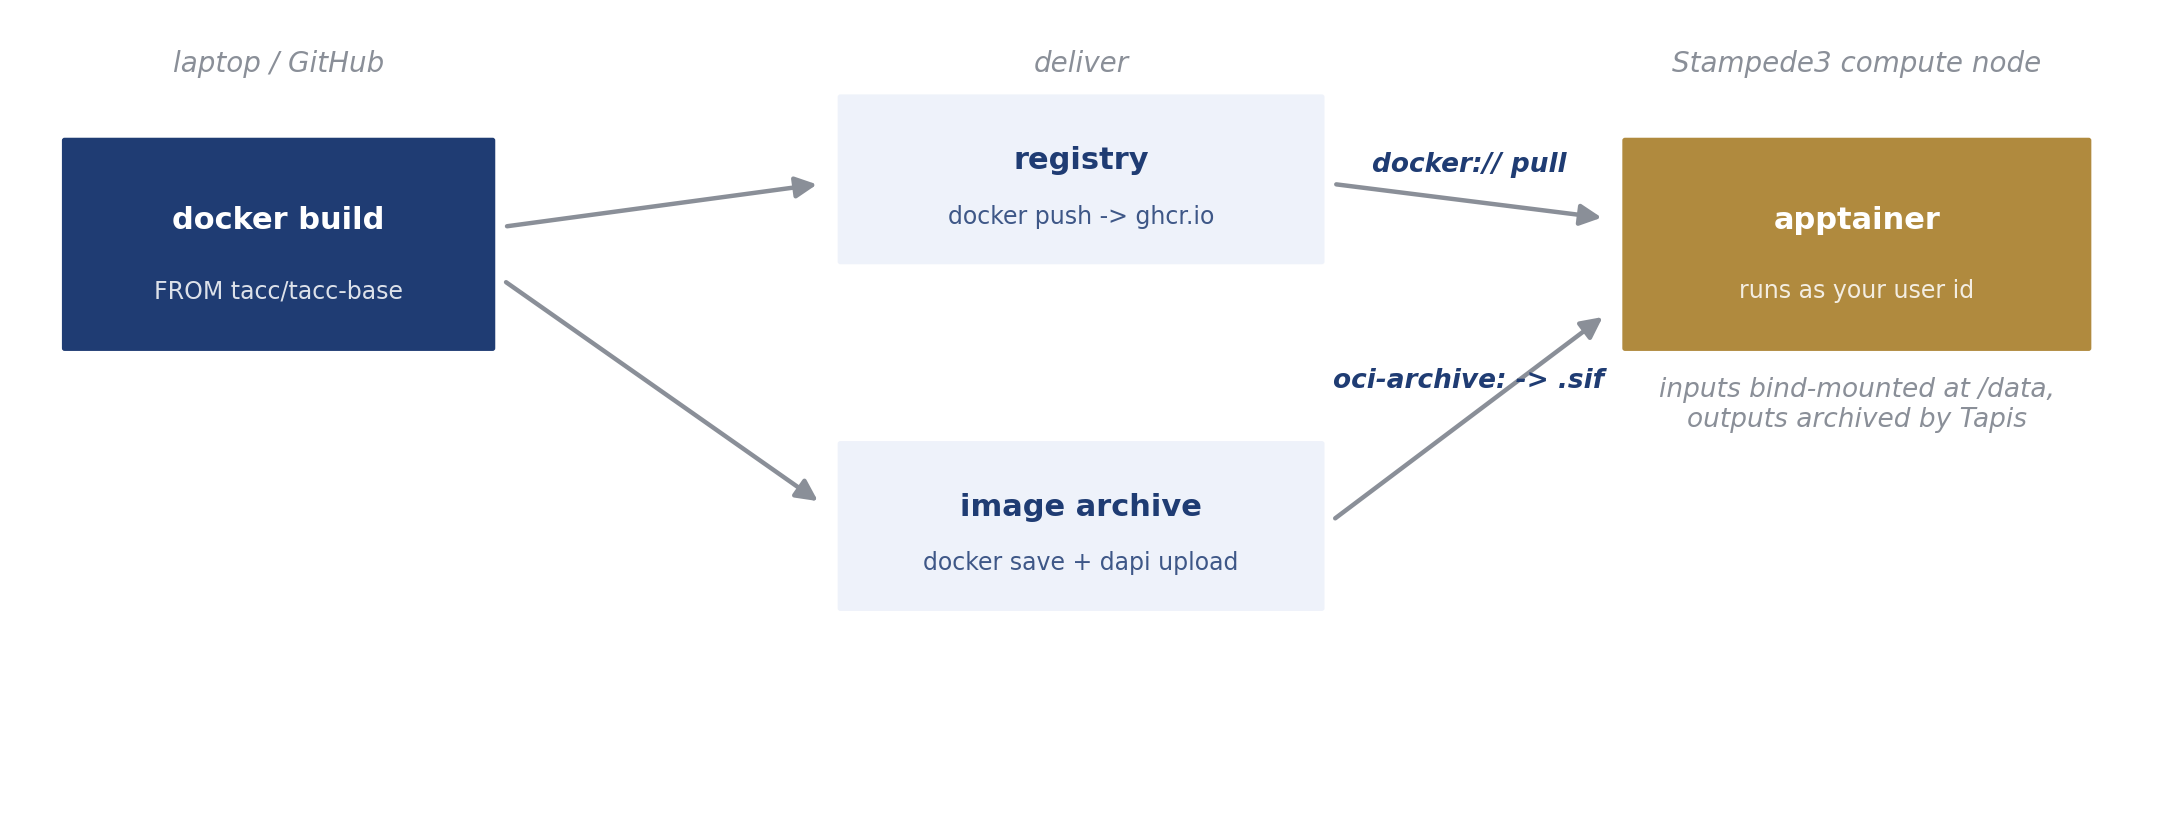
The worked example takes a site-response analysis (numpy plus one script) from Dockerfile to archived results. The finished version, including everything below, is the python-container-s3 repository.
Step 1. Write the Dockerfile
FROM tacc/tacc-base:ubuntu22.04-impi19.0.9-common

COPY requirements.txt /opt/app/requirements.txt
RUN pip3 install --no-cache-dir -r /opt/app/requirements.txt

COPY app/ /opt/app/

CMD ["python3", "/opt/app/site_response.py"]| Line | What it does | What you change |
|---|---|---|
FROM tacc/tacc-base:... | Starts from TACC’s Ubuntu 22.04 base with Intel MPI 19.0.9, so the toolchain matches the systems. | Pick another tacc/tacc-base tag (Ubuntu 20.04, Rocky 8, CUDA, MVAPICH) or any public base for serial code. The TACC bases matter when MPI inside the container must match the host fabric. |
COPY requirements.txt + RUN pip3 install | Installs your Python dependencies at build time, so jobs never pip-install on the compute node. | List your packages in requirements.txt. Non-Python stacks use apt-get install or conda here instead. |
COPY app/ /opt/app/ | Bakes your analysis code into the image at a fixed path. | Put your scripts in app/. Code baked into the image is versioned with the image; code that changes per run belongs in the job’s input directory instead. |
CMD [...] | The default command, used when the job does not override it. | Point it at your entry script. Jobs can always run something else via the COMMAND parameter. |
The repository layout that goes with it:
python-container-s3/
├── Dockerfile
├── requirements.txt
├── app/
│   └── site_response.py
└── .github/workflows/build-push.yml   # Step 3
Step 2. Build and test locally
Stampede3 is x86-64, so build for linux/amd64 explicitly (required on Apple Silicon, harmless elsewhere), and run the container once before anything touches HPC.
docker build --load --platform linux/amd64 -t site-response .
docker run --rm site-response
A container that fails here fails on Stampede3 too, so fix it locally where the loop is seconds instead of a queue wait.
Step 3. Publish the image
With GitHub Actions (recommended). Push the repository to GitHub with this workflow file, and every push builds the image and publishes it to GitHub Container Registry using the automatic GITHUB_TOKEN. No registry account or login exists anywhere.
# .github/workflows/build-push.yml
name: build-and-push
on:
  push:
    branches: [main]
    tags: ["v*"]
permissions:
  contents: read
  packages: write
jobs:
  build:
    runs-on: ubuntu-latest
    steps:
      - uses: actions/checkout@v4
      - uses: docker/setup-buildx-action@v3
      - uses: docker/login-action@v3
        with:
          registry: ghcr.io
          username: ${{ github.actor }}
          password: ${{ secrets.GITHUB_TOKEN }}
      - uses: docker/metadata-action@v5
        id: meta
        with:
          images: ghcr.io/${{ github.repository }}
          tags: |
            type=raw,value=latest,enable={{is_default_branch}}
            type=semver,pattern={{version}}
      - uses: docker/build-push-action@v6
        with:
          context: .
          platforms: linux/amd64
          push: true
          tags: ${{ steps.meta.outputs.tags }}
After the first build, make the package public once (repository page, Packages, package settings, Change visibility) so compute nodes can pull it anonymously. The image is then
docker://ghcr.io/<owner>/<repo>:latestWithout a registry. Save the image as a tarball and upload it once with dapi; it stages to jobs like any input file. Recent Docker writes OCI layout, so the app converts the tarball on the node with oci-archive:.
docker save site-response -o site-response.tards.files.upload("site-response.tar", f"{inputs_uri}/site-response.tar")Step 4. Register a container app, once
dapi ships the app as a template. new writes the two app files, deploy uploads the wrapper and registers the app under your account. Build your own app documents every field of both files.
ds.apps.new("my-container", template="container")
ds.apps.deploy("./my-container")
The custom-container-app notebook runs this step and the next two live. Skipping this step is fine for one-off runs. The container-demo example runs the same image through the generic python-s3 app with a short driver script instead; the app just removes that boilerplate.
Step 5. Submit a job
The image and the command are job parameters. Everything else is an ordinary Tapis job.
from dapi import DSClient

ds = DSClient()

inputs_uri = ds.files.to_uri("/MyData/site-response-inputs/")

job = {
    "name": "site-response",
    "appId": "my-container",
    "appVersion": "0.1.0",
    "execSystemLogicalQueue": "skx-dev",
    "nodeCount": 1,
    "coresPerNode": 1,
    "maxMinutes": 15,
    "fileInputs": [{"name": "Input Directory", "sourceUrl": inputs_uri}],
    "parameterSet": {
        "envVariables": [
            {
                "key": "CONTAINER_IMAGE",
                "value": "docker://ghcr.io/youruser/site-response:latest",
            },
            {"key": "COMMAND", "value": "python3 /opt/app/site_response.py"},
        ],
        "schedulerOptions": [{"name": "TACC Allocation", "arg": "-A MyAllocation"}],
    },
}
submitted = ds.jobs.submit(job)
submitted.monitor(interval=15)
For a staged tarball instead of a registry image, set CONTAINER_IMAGE to the tarball’s filename (site-response.tar); the app converts it on the node. For a private registry image, add APPTAINER_DOCKER_USERNAME and APPTAINER_DOCKER_PASSWORD to envVariables rather than baking credentials into anything.
Inside the job, the command runs with /data as its working directory.
| Path in the container | What it is on the node | Notes |
|---|---|---|
/data | the job’s staged input directory | The command starts here. Files written here are archived. |
/opt/app (or your COPY target) | the image, read-only | Rebuild the image to change it. |
/tmp | node-local disk | Scratch during the run, gone afterwards. |
$HOME, $WORK, $SCRATCH | host filesystems | Bound by TACC’s apptainer configuration; see the TACC containers guide. |
MyData and MyProjects are not mounted on compute nodes, so the container reads inputs only through the staged /data, and anything written outside a bound path vanishes with the container.
Step 6. Collect results
submitted.print_runtime_summary()
for item in ds.files.list(submitted.archive_uri + "/inputDirectory"):
    print(item.name)
submitted.download_output("inputDirectory/site_response.json", "site_response.json")
Containers in workflows
A containerized job is an ordinary job, so it drops into a DAG workflow unchanged: a gmprocess study becomes a graph whose nodes fetch waveforms, process record shards in parallel containers (docker://usgs/gmprocess), and aggregate a report, each node sized to its own resources.